Bunbury Driving Test Routes
Real turn-by-turn test routes throughout Western Australia
 Download Free!
Real turn-by-turn test routes throughout Western Australia
Download Free!
Practise REAL
Bunbury test routes.


14.30 mins
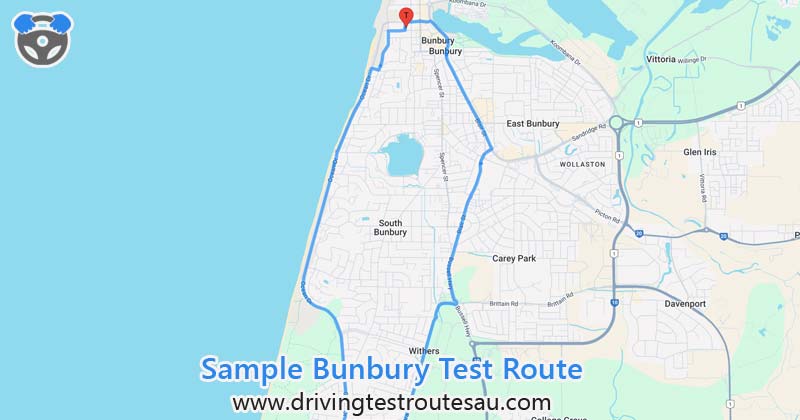
Route Duration20.58 km
Route Length1 / 5
Route Number| # | Instruction | Distance | Duration |
|---|---|---|---|
| 1 | Head north on Molloy St toward Symmons St | 0.09 km | 1 min |
| 2 | Turn right at the 1st cross street onto Symmons St Go through 2 roundabouts |
0.38 km | 1 min |
| 3 | Turn right onto Blair St | 0.59 km | 1 min |
| 4 | Head south on Blair St toward Hayes St | 1.49 km | 2 mins |
| 5 | Turn right to stay on Blair St | 0.15 km | 1 min |
| 6 | Keep right to stay on Blair St | 0.14 km | 1 min |
| 7 | Turn left | 0.01 km | 1 min |
| 8 | Head west toward Blair St | 0.01 km | 1 min |
| 9 | Turn left onto Blair St Go through 1 roundabout |
1.33 km | 2 mins |
| 10 | Continue onto Bussell Hwy | 0.74 km | 1 min |
| 11 | At the roundabout, take the 3rd exit onto Parade Rd Go through 2 roundabouts |
1.81 km | 2 mins |
| 12 | Head south on Parade Rd toward Guile Fairway | 0.24 km | 1 min |
| 13 | Turn right onto Washington Ave | 0.87 km | 1 min |
| 14 | At the roundabout, take the 3rd exit onto Ocean Dr | 4.02 km | 4 mins |
| 15 | Head north on Ocean Dr Go through 1 roundabout |
1.48 km | 2 mins |
| 16 | Turn right onto Scott St | 0.10 km | 1 min |
| 17 | At the roundabout, take the 1st exit onto Upper Esplanade | 0.08 km | 1 min |
| 18 | Head north on Upper Esplanade toward Haig Cres | 0.52 km | 1 min |
| 19 | Turn right onto Wellington St | 0.24 km | 1 min |
| 20 | Turn left onto Molloy St | 0.04 km | 1 min |
DOWNLOAD THE APP FREE!
A key road in Bunbury and one of the busiest sections of this route, where you’ll need to navigate both intersections and roundabouts. Lane discipline, gap distances and controlled braking are all important as you continue onto Bussell Highway. Keep an eye on the changing speed limits and use this opportunity to practise your mirror checks.
This long coastal road provides you with a chance to settle into a steady pace. You’ll need to navigate a roundabout, so practise your right-of-way rules, choose a suitable gap and try not to hesitate. As it’s a scenic route, it can be easy to lose focus, so regularly check your speed and mirrors, and stay alert for any sudden braking from other drivers.
A small but important street that leads into Upper Esplanade, a road with tight corners and limited visibility in some spots. This is the perfect place to demonstrate controlled handling and proper positioning within your lane. Watch out for parked cars and any pedestrians crossing the streets, especially near the cafes and public areas.
As you turn onto Wellington Street, you’re nearing the end of your route, but it's not time to relax just yet! This is a busier area, and you’ll need to be extra cautious near the intersections. The left turn onto Molloy Street is a short but important final move, so stay alert, make sure your positioning is correct and return to the Service Centre to complete the route.
24 Wellington Street
Bunbury
WA 6230
Phone: 13 11 56
By car:
Google Maps
On foot: Google Steetview
Total Routes: 5 (0 routes, 5 mocks)
Note: CTT and HPT must commence before 3:45 PM. It's recommended to book in advance for PDAs.