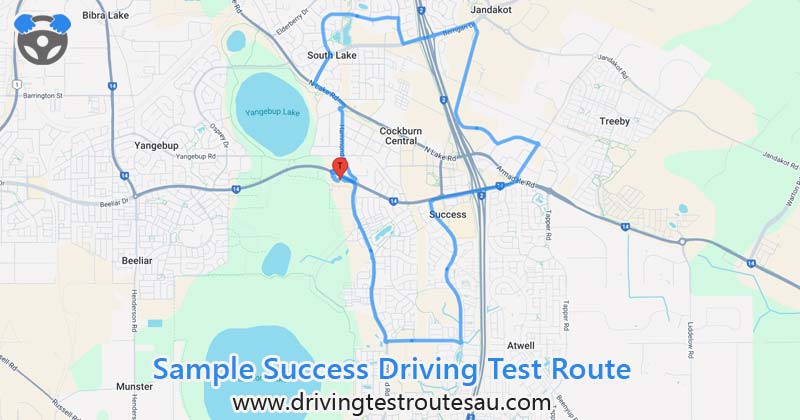
Success Driving Test Routes
Real turn-by-turn test routes throughout Western Australia
 Download Free!
Real turn-by-turn test routes throughout Western Australia
Download Free!
Practise REAL
Success test routes.


23.02 mins
Route Duration15.17 km
Route Length1 / 5
Route Number| # | Instruction | Distance | Duration |
|---|---|---|---|
| 1 | Head southwest toward Kemp Rd | 0.08 km | 1 min |
| 2 | Turn right toward Kemp Rd | 0.01 km | 1 min |
| 3 | Turn left toward Kemp Rd | 0.03 km | 1 min |
| 4 | Turn left toward Kemp Rd | 0.02 km | 1 min |
| 5 | Turn right at the 1st cross street onto Kemp Rd | 0.05 km | 1 min |
| 6 | At the roundabout, take the 2nd exit onto Beeliar Dr/ |
0.35 km | 1 min |
| 7 | Sharp left onto Hammond Rd | 1.02 km | 1 min |
| 8 | At the roundabout, take the 3rd exit and stay on Hammond Rd | 0.11 km | 1 min |
| 9 | Turn left onto N Lake Rd | 0.48 km | 1 min |
| 10 | Turn right onto Berrigan Dr | 0.46 km | 1 min |
| 11 | Turn left onto S Lake Dr | 0.95 km | 2 mins |
| 12 | Head east on S Lake Dr toward Moondarra Cir | 0.56 km | 1 min |
| 13 | Turn right onto Elderberry Dr | 0.35 km | 1 min |
| 14 | Turn left onto Berrigan Dr | 0.96 km | 1 min |
| 15 | Turn right onto Prinsep Rd | 1.62 km | 2 mins |
| 16 | Head east on Prinsep Rd toward Knock Pl/ |
0.36 km | 1 min |
| 17 | At the roundabout, take the 1st exit onto Verde Dr | 0.54 km | 1 min |
| 18 | At the roundabout, take the 3rd exit onto Solomon Rd | 0.56 km | 1 min |
| 19 | At the roundabout, take the 2nd exit onto Beeliar Dr/ |
1.18 km | 3 mins |
| 20 | Turn left onto Wentworth Parade | 1.07 km | 1 min |
| 21 | Head south on Wentworth Parade toward Chelsea Cct | 1.00 km | 1 min |
| 22 | At the roundabout, take the 2nd exit onto Bartram Rd | 0.68 km | 1 min |
| 23 | Head west on Bartram Rd toward Baningan Ave | 0.32 km | 1 min |
| 24 | At the roundabout, take the 2nd exit onto Hammond Rd Go through 2 roundabouts |
1.28 km | 1 min |
| 25 | Head north on Hammond Rd toward Coojong Link Go through 1 roundabout |
0.89 km | 1 min |
| 26 | Turn left onto Beeliar Dr/ |
0.13 km | 1 min |
| 27 | Slight left | 0.06 km | 1 min |
| 28 | Turn right | 0.07 km | 1 min |
DOWNLOAD THE APP FREE!
This is a busy arterial road that connects straight to the Kwinana Freeway. You can expect a mix of local and through traffic, and with multiple lanes plus a steady flow of vehicles, lane discipline will be key. The speed limit here is higher than the residential streets you've been on, so make sure you adjust accordingly while maintaining a safe following distance.
A common part of the test route, while a single-carriageway, still sees a fair bit of traffic. The speed limit is generally 60 km/h, but as you pass through residential areas, be mindful of pedestrians and cars pulling out of driveways. Roundabouts are common here, so slow down on approach, check from the right, and signal clearly when exiting.
One of those roads where you need to stay extra alert. It’s a key connector, meaning there’s a mix of residential, commercial, and local traffic. There are multiple intersections and plenty of driveways leading to shops and businesses, so keep an eye out. There are multiple traffic signals along this stretch, so practise your smooth braking and acceleration.
This is a key road running parallel to the Kwinana Freeway, which is often used as an alternative route by local drivers. This means you’ll likely encounter a mix of vehicles, from commuters to trucks heading into industrial areas. Stick to the speed limit, check your mirrors frequently, and be prepared for unexpected stops along the way.
Unit 3, 3/660 Beeliar Dr
Success
WA 6164
Phone: 13 11 56
By car:
Google Maps
On foot: Google Steetview
Total Routes: 5 (0 routes, 5 mocks)
Tip: Book assessments and tests in advance to ensure availability.